
This is a continuation from my previous blog Data Loss Prevention Policy Authoring : The WHYs and HOWs Part 1 – Kevoh.Ninja.
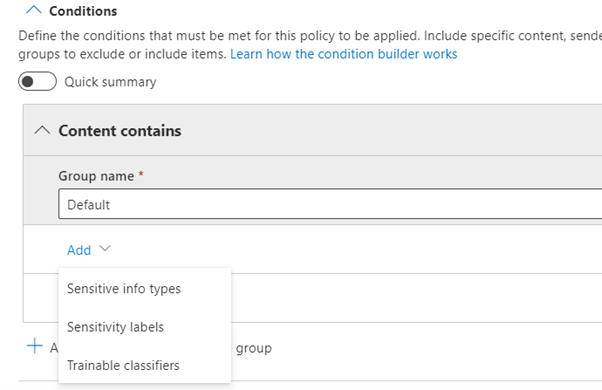
When creating DLP policies in Microsoft Purview Data Loss Prevention, you get a wide pool of conditions and actions you can configure.You can create a DLP policy that checks whether content contains sensitive information types, sensitivity labels or trainable classifiers. In our case we will select Sensitive information types as we want to check for credit card information.
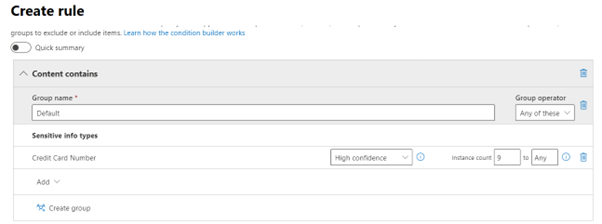
Selecting a sensitive information type that you want to detect brings more options to configure. You can set the confidence level and instance count that you want to monitor. This can be helpful when you want to create two rules within one DLP policy with one of the rules being more restrictive i.e., you can have two rules to check for credit card information, one of the rules which is less restrictive can monitor for an instance count of 1 to 9 and just notify the user about the sensitive information with a policy tip. Then create a more restrictive rule that checks for an instance count of 9 and above then apply actions such as blocking the activity or forwarding the email to a manager for approval and notifying the admins. Creating two rules to check for different numbers of instance count will be helpful in situations that sharing of the sensitive information is expected but not in high numbers.
Sometimes being restrictive with DLP policies can hinder productivity in cases where the DLP policy completely blocks the activities. In this situation, you can configure the capability to forward a policy violation to a manager before the email that contains sensitive information can be sent, this will make sure that the sender can still send the sensitive information but only if authorized. Another way of easing the restrictions is using the user override functionality. This feature enables the end user to provide a business justification before sending out sensitive information.
Another way of easing the DLP policy restrictions while still making sure your DLP policy has full coverage is the use of nested groups when authoring your DLP policy. This grouping allows the use of Boolean logic (AND, OR NOT). For instance, we can create a policy to prevent sharing of sensitive information outside the organization but allow specific managers/individuals to bypass the policy or allow only specific recipient or organization to receive the sensitive information.

In the example above, we can use the nested groups to allow specific induvial to bypass the DLP policy and send out sensitive information or allow specific domain to receive the sensitive information. This can be useful when you have a partner company that you frequently share sensitive information with.
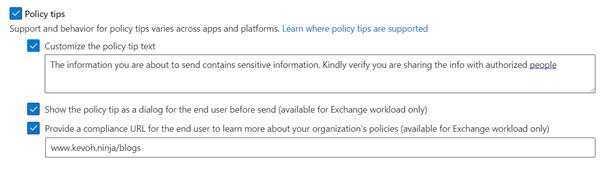
Making your user aware of the actions they are about to perform is important in ensuring organization data is protected. For instance, when a user is creating an email and the email contains sensitive information, policy tip will notify the user that the email has been detected to have sensitive information and they should verify their actions. This can be great especially when you are beginning your DLP journey and you don’t want to be too restrictive at the start of the journey, the policy tip will educate the users of their actions before they send out the email that contains sensitive information.
With this in mind you can start your Microsoft Purview DLP journey configuring the less restrictive rules such as the user notifications with policy tips and gradually roll out the restrictive rules such as forwarding an email to a manager for approval or completely blocking the action.